![M4 Board [Schneider CPC]](https://www.jungsi.de/blog/wp-content/uploads/m4-wifi.jpg)
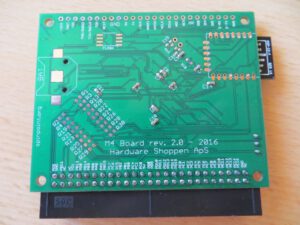
M4 Board – a very simple name for a great new board for the Schneider CPC – this time from Denmark. I ordered my version with a connector for the already familiar Mother X4.
Work is still ongoing on the device, and fortunately the firmware can be updated relatively easily.
The M4 features a microSD card slot and Wi-Fi! The board can be powered directly from the CPC or via a USB power supply. The M4 has a jumper for this purpose, which can be used to set the appropriate option. If EXT is selected, the CPC’s power supply is used; if USB is selected, the USB port is used.
There are two status LEDs:
ON – indicates whether the board is powered (blue LED)
DD – Disc Drive – this LED flashes when data is being read from or written to the SD card
The switch on the M4 can be used to reboot both the board and the CPC
Usage
Insert a microSD card into the M4 Board. It is best to format this using FAT32. Then switch on the CPC.
From this point onwards, the SD file system can be used – e.g. SAVE/LOAD/RUN/CAT etc.
LOAD/SAVE should behave as normal – if no file extension is used, it is automatically added (., .bas, .bin) – .bak files are generated when files are overwritten using SAVE.
If you wish to use the web interface, Romboard, real-time clock or file downloads from the internet, you will need to configure the network settings.
This can be done using an RSX command: |netset,““
Parameters
name – NetBIOS name; use uppercase letters and numbers only
ssid – Name of the Wi-Fi network (case-sensitive)
pw – Wi-Fi network password
dhcp 0 = disables DHCP and uses a static IP, 1 = uses DHCP (static IP settings are ignored
ip – static IP for the CPC
gw – Network gateway
nm – Network subnet mask (normally 255.255.255.0)
dns1 – DNS server (e.g. Google: 8.8.8.8)
dns2 – Backup DNS server (e.g. Google: 8.8.8.4)
ntp – NTP time server – used to synchronise the time
tz – Time zone – can be +/- 12 hours – set according to your own time zone
Example when using a DHCP server
|netset,“name=CPC6128, ssid=NETGEAR, pw=12345678, dhcp=1, dns=8.8.8.8, dns2=8.8.8.4“
That’s all you need to get connected to the internet. The rest of the settings can be configured via the M4 Board’s web interface.
Check the settings
|netstat
if the connection is working, the IP address will be displayed
You can enter this IP address into a browser (or the NetBIOS name that was previously set) and configure the remaining settings under ‘Settings’
If the NetBIOS name is used:
http://CPC6128
It may take a moment the first time you use it, as the computer first needs to link the NetBIOS name to the IP address.
If the IP address is used:
http://192.168.178.203
Once the initial settings have been configured, the relevant data is saved to the microSD card in the m4 folder as config.txt. This file can also be edited, allowing changes to be made directly. The next time the device is switched on, these settings will be loaded and the CPC will automatically connect to the internet. It is recommended to use a static IP (rather than DHCP), as this ensures that the M4 board connects almost instantly.
File system
For compatibility reasons, file names are displayed in the 8.1 format. Directory names are displayed in full if they consist of fewer than 17 characters. If the names are longer, short names are used.
Commands
The same commands are used as in the original system, e.g. load, save, run, openin, openout, cat etc.
To ensure proper handling of directories, Wi-Fi and other features, a number of RSX commands have been added and their capabilities expanded.
On CPCs running Basic 1.0 (e.g. CPC464), the RSX commands work slightly differently, meaning that parameters cannot be passed directly to the RSX. In this case, they must be passed via a variable.
e.g. changing to a subdirectory (the name of the directory is: DISCS)
BASIC 1.0:
A$=“DISCS“:|cd,@A$
BASIC 1.1:
|cd,“DISCS“
Important commands and their meaning/use
|CD – change directory, as in DOS
|cd,“games” – changes to the “games” directory
|cd,“games/batman” – changes to the “games/batman” directory
|cd,“.. – go back one directory
|cd,“/ – return to the root directory of the SD card
DSK files, which are used in many emulators, can also be used like directories
|cd,“robocop.dsk“ – changes to the DSK file as if it were a folder
|cd,“.. – jumps back out of the DSK file
Note: DSK files are currently read-only!
|DISC – switch to the AMSDOS floppy disk drive, if available
|SD – switch to M4 (MicroSD)
|TAPE – switch to cassette
|SNA – Start Snapshot Image
|SNA,”FRANKIE.SNA”
|COPYF – copies file
|copyf test.bas test2.bas (source file, destination file)
|FCP – copies files between microSD cards and floppy disks
|FCP,”FILE.BIN”, “A:” – copies FILE.BIN to drive A
The SD card can also be accessed using the drive letter C
|FCP,”A:FILE.BIN”, “C:” – copies FILE.BIN from drive A to the current directory on the microSD card
It is possible to use wildcards, such as “*” to copy all files from a floppy disk to a directory
|FCP,”A:*”,”C:” – copies all files from floppy disk A to the current directory
|REN – Rename file
|ren “new.bas”,“ old.bas”
Just as with CPC floppy disks, the command can also be used to move a file or folder from one directory to another
|ren,“games/robocop.dsk“,“robocop.dsk” – moves the file from the current directory to the games directory
|ERA – delete a file or directory
Wildcards can be used to delete multiple files/directories
|era,“*. bak” – deletes all .bak files in the current directory
|era,“games/r*.d?k” – deletes all matching files in the “games” directory
|MKDIR – Create a directory
|mkdir,“games/discs“ creates a subfolder in the “games” directory
|DIR – Display directory contents – as with CPC floppy disks – wildcards can be used, similar to the CAT command
|dir,“games/discs/b?t*.dsk“ etc.
|LS – displays directories with long filenames – the maximum length depends on the display mode
|DSKX – Extract DSK
|dskx,”somedisk.dsk”,”/path”
|TIME – displays the current time if a suitable NTP server has been configured
|NETSET – see above under ‘Basic settings’
|NETSTAT – displays the current status of the network connection
|HTTPGET – download a file from the internet to a specific directory
Parameters: url:port/name
If no port has been configured, port 80 is used
|httpget,“spinpoint.org:80/battro.dsk“ or
|httpget,“spinpoing.org/battro.dsk“
HTTPMEM – a file is loaded from the internet into memory; the maximum size in a single operation is 0x4000 bytes, but an offset can be specified, allowing more data to be loaded in chunks
Parameters: url:port/name, memory address, size to read
|HTTPMEM,“spinpoint.org/FIST.BIN“,&C000,&4000
Example with offset: |HTTPMEM,“spinpoint.org/battro.dsk, offset=0x10000“,&8000, &1000
|ROMUP – load a ROM into a specific slot.
|ROMUP,”UTOPIA.ROM”,15 – loads the Utopia ROM into slot 15
|M4ROMOFF – disables the M4 ROM until the next reboot – used when access to the standard floppy drive is required or a CPC+ cartridge needs to be booted
|VERSION – displays the current firmware version of the ESP8266 and Cortex M4
|UPGRADE – downloads the latest firmware from the internet, if available. The M4 board must then be restarted – either using the reset switch or by switching the power off and on again. The upgrade process will then begin, and once complete, the board will display the normal power-on message again.
Experiences
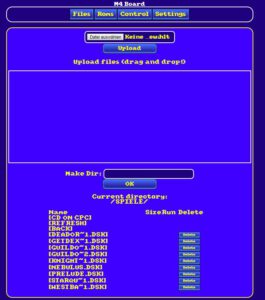
I’d already copied a few DSK files onto the SD card beforehand. First, I disconnected all the other interfaces from the MotherX4 board, plugged in the M4 board and switched on the CPC – didn’t work. So I had to connect a power supply to the MotherX4 after all (I’m using a 5V 1A one). Now everything is OK after switching on. First of all, I typed in CAT and lo and behold: it’s already working. The SD card is recognised as drive A:. Next, I set up the Wi-Fi using |NETSET and obtained an IP address with |NETSTAT. Works 🙂 Having already read about a firmware update on the CPC forum, I tried |UPGRADE and updated to version 1.03. Next, I tested the web interface (entering the IP address displayed by |NETSTAT). There are four tabs there – one for file upload, one for the ROM board, and one for settings. Everything is very clear and in the CPC design. I ‘uploaded’ another DSK file via file upload – after running |CAT on the CPC, I found the file on the SD card too. A DSK file can also be ‘started’ – first, ‘open’ the file (disk) with |CD,”WESTBANK. DSK” and start it with RUN” – that works too. If the DSK file is longer than 8 characters, it looks like this: WESTBA~1.DSK – this can also be opened; the ~ character can be displayed using Control+2. Directory names may be up to 17 characters long.
Test beta firmware
Beta versions of the firmware appear from time to time – simply copy the files to the root directory of the SD card, switch on the device, and the upgrade will run. Once the process is complete, the files are automatically deleted.
Use in conjunction with XMEM
As the M4 board also offers 32 ROM slots, this may conflict with the XMEM. The simplest solution is to disable the XMEM’s ROM slots (set the jumper under the large chip to NO). If 64 ROM slots are to be used (XMEM and M4 together), the start position of the ROM slots must be set to 32 via the M4’s web interface, so that the M4 slots are mapped behind the XMEM slots. However, this can cause issues with the position of the M4 ROM, unless you have a CPC 6128 where ROM 7 can be replaced.
Using ParaDOS
Can ParaDOS be used with the M4? Normally, it replaces AMSDOS in Slot 7
-> The M4 ROM can be used in Slot 5, and ParaDOS is then loaded into Slot 6.
Important firmware changes
v2.0.4 beta 8 – http://www.spinpoint.org/cpc/M4FIRM_v204b8.zip
If 512 KB CPR (cartridges) are used, the top 16 ROMs on the M4 ROM board must be sacrificed. Simply tick the “only 16 roms” box on the ROM page in the web interface.
The ability to load and start cartridges on the M4 via the web interface has also been added.
It is now also possible to change disks via the web interface – press [CD ON CPC] once the disk has been selected.
V2.0.4 beta 6 – http://www.spinpoint.org/cpc/M4FIRM_v204b6.zip
– numerous bug fixes for DSKs – games such as Chibi Akuma now display a loading screen again, and games with fragmented blocks, such as Ninja Grannies and other games by @Joseman)
– new command – |dskx – extract DSK
This allows files to be extracted from a DSK image
Usage: |dskx,”somedisk.dsk”,”/path”</em
Useful software
– cpcxfer
Command-line tool for transferring files to and from the M4 via Wi-Fi.
– YANCC
1. Download the latest version and save it to an SD card
2. Open the relevant disk
3. Open the “config.bas” file and start configuration – first select “Autostart YANCC” / “Autostart Launcher”
4. YANCC ROM in slot 1 and Launcher ROM in slot 9
– Disk Navigation
A modified version of Joe Halstead’s Disk Menu programme to facilitate navigation within directories,
1. Save the BAS file in the root directory of the SD card – use the cursor keys to navigate
2. Press the space bar to open a directory or select a file to load or run. Press Cancel to select a different file. 0 = exit the directory
3. If the .BAS file is renamed to autoexec.bas, it will start automatically when the CPC is switched on
4. The programme can be exited by pressing ESC twice
– File Launcher
A simple file launcher as an additional program (ROM) for YANCC, which can, however, be used separately (though YANCC.ROM and LAUNCHER.ROM must be installed)
– Programme menu
with programme and games available to download directly from the internet by Rafa32gr
– M4FE
a front-end for the M4 for launching programmes. It is installed in one of the ROM slots and started with |M4FE. It can be operated using the cursor keys or a joystick. The software can also be assigned to one of the function keys – e.g. “F0” – simply type the following line and save it as AUTOEXEC.BAS:
10 KEY n,”|M4FE”+CHR$(13)
Update 2025
Production ceased in October 2025 – but the data has been published, so anyone can make the circuit boards themselves: https://github.com/M4Duke/m4hardware
Duke from Denmark has created a wonderful device here. A mass storage device for the CPC that is easy to use, a ROM board and Wi-Fi to boot. What more could you want? Add to that firmware with a great range of features and excellent support. Its success proves him right – he has already sold over 350 boards! At the same time, he is also working on a new version that can do even more – so we can look forward to seeing how he plans to improve the M4 board.
![DDI-1 Interface [Schneider CPC]](https://www.jungsi.de/blog/wp-content/uploads/ddi-1-vorderseite.jpg)
![MegaFlash NG [Schneider CPC]](https://www.jungsi.de/blog/wp-content/uploads/2014/07/MegaFlash-NG.png)
![Imperium Solo – USB-Adapter [Schneider CPC/Commodore 64 u.a.]](https://www.jungsi.de/blog/wp-content/uploads/Imperium-Solo-Schneider-CPC.jpg)
Hallo Jungsi,
ich versuche schon seit einiger Zeit ein M4 und XMEM gleichzeitig in einem CPC464 zu betreiben.
Welche Einstellungen muß ich am XMEM vornehmen und welche im WebInterface des M4 ? Damit ich vom XMEM starten kann und auch die Slots dort mit dem ROMAN sehen kann?
Wo bekommt man das M4 Board her ?
Am einfachsten über das CPC Wiki Forum: http://www.cpcwiki.eu/forum/amstrad-cpc-hardware/amstrad-cpc-wifi/ und eine PN an den Ersteller des Beitrags mit dem Namen “Duke” senden.
Ein richtig geiles Teil ist das. Nach deinem super Bericht habe ich mir auch direkt eines besorgt!
https://8bitrechner.wordpress.com/2019/03/09/m4-board-fuer-den-cpc/
hola estoy interesado placa m4 board salidos Javier
Hola, lamentablemente no soy el fabricante de la placa M4. Tal vez alguien en el foro CPC-Wiki puede ayudar:
https://www.cpcwiki.eu/forum/index.php